
I love to bake! And Christmas is a great excuse to make all kinds of cookies that I normally try to keep out of my house for self-control reasons. This year I stuck to the basics: my four favorite kinds of Christmas cookies. I like to think that I have the perfect recipes for all four. So I thought I'd share them with all of you! And, by the way, I've arranged them in order from easiest and fastest to most difficult and time-consuming. So if you haven't started baking yet and want something quick, start with the first recipe. They're amazing, and everyone will be impressed by your baking skills!
A few quick notes before we get started:

-- I personally believe that the only cookie worth eating is a soft, chewy cookie! Save the crunch for pretzels! So here's the two-part secret to soft cookies: 1) bake them for the lowest amount of time possible. The cookies should not look done when you pull them out of the oven. The edges should be firm, but not brown, and the tops should be puffy. 2) Let the cookies sit on the cookie sheet for about 5 minutes (Set a timer.) before transferring them to a cooling rack. That way, the outside of the cookie cooks in the oven, and the inside cooks on the pan without the outsides getting crunchy.
--Two of these recipes (Gingerchews and Sugar Cookies) call for chilling the dough for at least an hour before baking the cookies. This is unavoidable! Otherwise your cookies will be (again, the dreaded word!) crunchy! The longer you chill it for, the better. In fact, I like the make the dough on one day, chill it overnight, and bake the cookies the next day.
So, here are my four totally delicious, painstakingly perfected, absolutely-necessary-for-the-holidays, recipes for Christmas cookies!
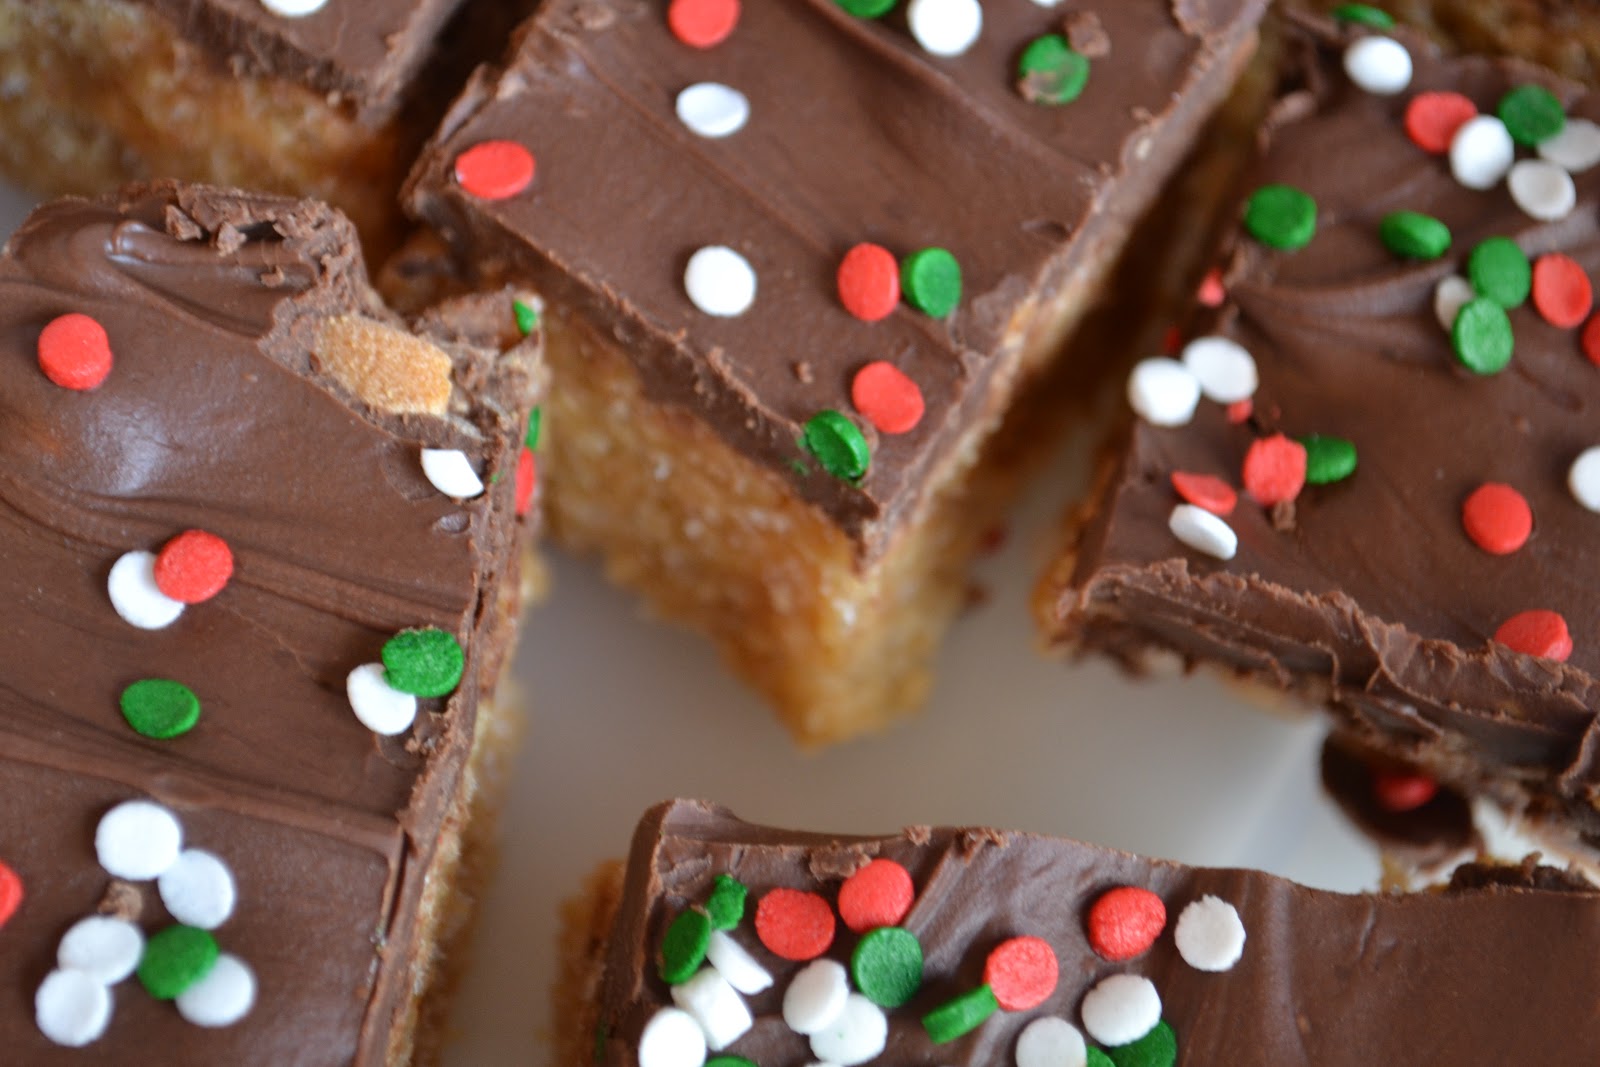
Chocolate Scotcheroos
My Aunt Elaine (You can read her blog here.) used to bring these to every Christmas gathering. And believe me, once you've tasted them, you will never go back to regular boring old Rice Krispy treats again!The original recipe is straight of the Rice Krispy website, but I've modified it a bit, and I (of course) think my way is even better than theirs!
* 1 cup light corn syrup
* 1 cup sugar
* 1 cup smooth peanut
butter
* 6 cups Rice
Krispies®
* 2 cups semi-sweet
chocolate morsels
* 1 cup
butterscotch chips
* red & green sprinkles (optional)
- Place corn syrup and sugar into 3-quart saucepan. Cook over medium heat, stirring frequently, until sugar dissolves and mixture begins to boil. Remove from heat.
- Stir in peanut butter. Mix well. Add Rice Krispies. Stir until well coated. Press mixture into 13 x 9 x 2-inch pan coated with cooking spray. Set aside.
- Meanwhile, melt chocolate and butterscotch chips together in 1-quart saucepan over low heat, stirring constantly. Spread evenly over cereal mixture. Add sprinkles over the top. Let stand until firm.
- Cut into 2 x 1-inch bars when cool.
- Makes about 40.
Some notes:
--Make sure you melt your sugars together in a pan big enough to add in the Rice Kripies.
--The chocolate and butterscotch can take forever to melt, so ideally you should have someone (spouse? responsible child?) stirring them while you're making the Rice Krispy part.
--The treats take about 6 hours to cool (unless it's the middle of the summer and your house is 85 degrees! Then they never harden!) If you cut them too soon, they will be all gooey. If you wait till the next day, they'll be solid as a rock!
--The best way to cut the treats is to slide a knife around the edge to loosen, use a pancake turner (or two) to transfer the whole thing to a cutting board, and then cut them up with a pizza cutter.
Peanut Blossoms

I know you may think you've had peanut blossoms before, but you've never had them like this! My mom found this peanut butter cookie recipe in the cookbook that came with her Pampered Chef pizza stone. Of course she modified it a bit and created The World's Best Peanut Butter Cookies. I turned them into peanut blossoms because that's my favorite way to eat a peanut butter cookie!
* 3/4 cup smooth Smuckers All Natural peanut butter
* 3/4 cup shortening
* 1/2 cup firmly packed brown sugar
* 1/2 cup granulated sugar
* 1 egg
* 1/2 teaspoon vanilla
* 1 cup all purpose flour
* 1/2 teaspoon baking soda
* 1/2 teaspoon salt
* 1 small bag Hershey Kisses (enough for 3-4 dozen cookies)
* extra sugar
- Preheat oven to 350.
- Cream together peanut butter, shortening, sugars, egg, and vanilla.
- In separate bowl combine flour, baking soda, and salt. Add to creamed mixture a little at a time until completely blended. Dough will be slightly sticky.
- Form dough into 1 1/2 inch balls. Roll balls in sugar. Place 2 inches apart on baking sheet.
- Bake 11-12 minutes until edges are firm, but not brown. Remove from oven.
- Immediately place a Hershey Kiss in the center of each cookie. Let cookies stand on sheet for 5 minutes.
- Makes 3-4 dozen.
Notes:
--The All Natural peanut butter is what makes these cookies so special. Regular Jiff or Peter Pan doesn't have as strong a "peanutty" taste.
--Unwrap all your Kisses ahead of time, so you can put them on the cookies immediately.

Gingerchews
Supposedly, Gingersnaps are supposed to be crunchy, so they "snap" when you eat them. However, in case you haven't figured it out by now, I don't do crunchy cookies. So these are my alternative! I found the recipe online several years ago, before the days of Pinterest, so I have no idea whose blog I stole it from. If you recognize it, let me know so I can give credit where credit is due!
* 3/4 cup butter, softened
* 1 cup white sugar
* 1 egg
* 1/4 cup molasses
* 2 cups all purpose flour
* 1 tablespoon ground ginger
* 1 teaspoon cinnamon
* 2 teaspoons baking soda
* 1/2 teaspoon salt
* extra sugar
- In a medium bowl, cream together butter and sugar until smooth. Beat in the egg and molasses until well blended.
- Combine the flour, ginger, cinnamon, baking soda and salt; stir into the molasses mixture a little at a time to form a stiff dough.
- Chill dough in refrigerator for at least 1 hour.
- Preheat oven to 350 degrees.
- Roll dough into 1 inch balls and roll the balls in the remaining sugar. Place cookies 2 inches apart onto cookie sheets lined with parchment paper.
- Bake for 8 to 10 minutes. Cookies should be brown around the edges, but soft in the center. Allow cookies to cool on baking sheet for 5 minutes before removing to a wire rack to cool completely.
--Use a measuring stick to make sure your cookie balls are exactly 1 inch. It's smaller than you think!

Sugar Cookies
I found the beginnings of this recipe on Pinterest, but I changed it up a little. I'll admit, sugar cookies are time-consuming. This year I made them over three days. The first day I made the dough and left it to chill. On day two I baked the cookies. And then the last day I decorated them. I also decided to make all the same shape of cookie so that I didn't have to juggle multiple cookie cutters and multiple colors of frosting. And while we're on the subject of frosting. The most artistic way to frost sugar cookies is with Royal icing, a nasty tasting concoction of sugar and egg whites. It may look nice, but I don't think it's worth sacrificing taste! So I frost them with a recipe my mom got from a lady in our church when I was a teenager. That's why the recipe is called Jean's Buttercream!
* 1 cup butter, softened but still cold
* 2 cups white sugar
* 2 eggs
* 3 teaspoons vanilla
* 1 cup sour cream
* 1 teaspoon salt
* 2 teaspoons baking soda
* 5 1/2 cups flour
- Cream together butter and sugar.
- Add eggs and vanilla. Mix.
- Add sour cream. Mix.
- In a separate bowl, combine salt, soda, and flour. Add to butter mixture a little at a time until completely combined.
- Chill dough for at least 3 hours or overnight.
- Divide dough into 4 inch diameter balls. Roll out each ball of dough between two sheets of waxed paper to 1/4 inch thick. When each sheet of dough is rolled out, place it in the freezer while working with the next.
- Preheat oven to 375.
- Remove first sheet of dough from freezer. Remove wax paper. Using a floured cookie cutter, cut out shapes. Remove scraps between cookies and then transfer cookies to cookie sheet. Roll out scraps between two sheets of wax paper to 1/4 inch thick. Return to freezer.
- Repeat with all the dough, including the new sheets made from scraps.
- Bake 7-8 minutes. Cookies will not look done. They should not be at all brown and should be soft and "pillowy."
- Allow to cool on baking sheet for 5 minutes before removing to wire rack.
- Allow to cool completely before frosting.
- Makes 2-3 dozen large or 4-5 dozen small cookies.
Notes:
--Use a ruler to measure to make sure that your dough is exactly 1/4 thick. That's very important. If it's too thick your cookies will be underdone and you will have to throw them away (speaking from experience!).
--Flour your cookie cutter before you cut each cookie.
--Making these is kind of a juggling act. Your first batch will be baking while you're cutting out your second. Then you'll be pulling some out of the oven while you try to roll out your scraps.
--It's really, really tricky to get the right amount of doneness on these cookies. You have to catch them before they turn brown, but not too soon or they won't be done! Trial and error is all I can tell you!
Jean's Buttercream
* 2 cups butter, softened but still cold
* 1/3 cup shortening
* 2 tablespoons vanilla
* 1 3/4 pounds powdered sugar
- Cream together butter and shortening until just mixed.
- Mix in vanilla.
- Add in sugar and mix (covered if you have a stand mixer) until just dissolved. Do not over-mix or frosting will be runny.
- Divide into small batches and stir in desired food colorings to each batch.
Notes:
--The original recipe called for a 2 lb bag of powdered sugar. But the resulting frosting was too sticky sweet. So here's the trick for putting in less: pinch the bag with your fingers about 3-4 inches from the bottom, so that when you dump in the sugar, not all of it gets dumped in! That's how you "measure" out 1 3/4 pounds of sugar.
--I only needed half a recipe to frost my sugar cookies. So you might want to make less.
No comments:
Post a Comment